The ability to configure your preferences in MAXIMIZERCRM means you can have the system set up exactly how you want it. This saves you time as you can quickly and easily navigate your way around, view particular areas and conduct certain actions that are common to you as a user. Here’s an overview of how to access your MAXIMIZERCRM preferences, what the options mean and how to make those configurations.
Accessing your Preferences
In the top-right corner of the page, click on the cog icon to access your Preferences:

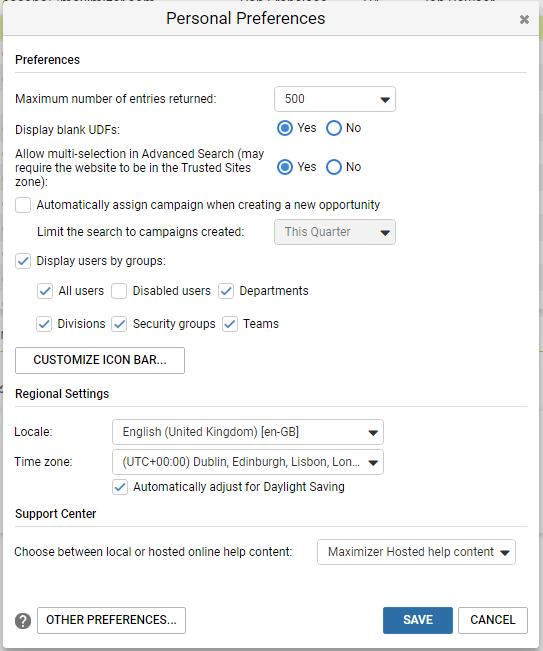
The basic Preferences will appear:

MAXIMIZERCRM Preference Options Explained
1. Maximum number of entries returned
This option controls how many records are returned when you perform a search. Most of the time, the range from 100 to 10,000 will be more than enough. However, if your database is particularly large or you know you are casting a wider search, you might want to select the *All option.
Tip: The more entries you choose to return, the longer it will take to load. We therefore suggest avoiding the *All option if you can. You can always adjust it when you need to do a wider search.
2. Display Blank UDFs
When on a particular record and looking at the User-Defined Fields (UDFs) tab, you can choose to only see UDFs with values (the most common option) or the complete list of UDFs – tick the Display Blank UDFs option to set this as the default option.
For example, if you want to find out what information you don’t know about your prospect / customer / opportunity / customer service case, looking through the blank UDFs is a great prompt for questions when you next speak with them.
Tip: You can toggle this setting from the User-Defined Field tab.
3. Allow multi-selection in Advanced Search (may require the website to be in the Trusted Sites zone)
This option, when ticked, allows you to search by more than one field at once. This is one of MAXIMIZERCRM’s best features as it’s a powerful search feature. Most people will have this activated as part of their User setup.
4. Automatically assign campaign when creating a new opportunity
Linking Opportunities to Campaigns enables you to see the Return on Investment (ROI) for each campaign i.e. how much revenue the Campaign generated.
When you log a new opportunity, if the related Address Book entry is subscribed to a single Campaign, the campaign is automatically assigned to any new Opportunities within a specified period.
If the related Address Book entry is subscribed to multiple Campaigns in the time period, you will be prompted to select the appropriate Campaign.
5. Limit the search to campaigns created
This setting is closely tied to point 4 above (Automatically assign campaign when creating a new opportunity).
This field is where you set the time period in which Campaigns must be created in order to be included in the ROI (Return on Investment) for the Campaign. You can limit the search to campaigns created in the current year, quarter or month.
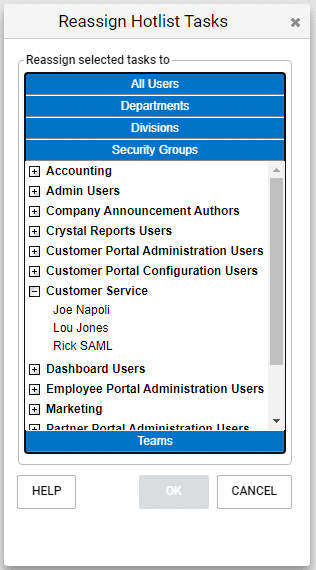
6. Display users by groups (All users, Disabled users, Departments, Divisions, Security Groups, Teams)
Whenever you see a list of users, for example when:
- Scheduling an appointment
- Reassigning a Hotlist Task
- Configuring Opportunity Monitoring
- Configuring Case Monitoring
you can choose whether to view all users in a single list or group them by:
- Departments (only users with a Department set will appear in this list)
- Disabled Users (you can add disabled users to appointments and to opportunity / customer service case monitoring)
- Divisions (only users with a Division set will appear in this list)
- Security Groups
- Teams (sales or marketing teams)
This is particularly useful for MAXIMIZERCRM systems with lots of users to make it quicker and easier to find the right colleague.

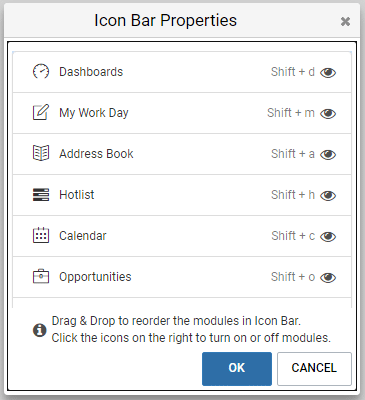
7. Customise the Icon Bar
One of MAXIMIZERCRM’s top features is the ability to configure the workspace to be exactly as you need it. Remove unused modules by customising the Icon Bar. You can:
- Select the Modules you want to display
- Change the order of the Modules to suit your working style

This setting just relates to the Icon Bar (the left hand navigation menu) but you can also show / hide tabs within the Address Book, Opportunities, Campaigns, Customer Service and Hotlist modules.
Note: Hiding a tab in one module will not hide in from the other modules.
8. Regional Settings
Locale and Time Zone
These settings determine how date, time, number, and currency values are displayed.
Used in conjunction with the Administrator “Automatically format phone numbers to my locale” option, this setting will also format your phone numbers appropriately for your region. See our previous blog on Auto Formatting Phone Numbers.
When you log into MAXIMIZERCRM, your computer’s time zone is compared with your MAXIMIZERCRM time zone setting and if they don’t match, a message will appear prompting you to change your time zone in MAXIMIZERCRM.
Automatically adjust for Daylight Saving
In the UK, we change our clocks during the summer months to move an hour of daylight from the morning to the evening. This setting will ensure that your MAXIMIZERCRM stays up to date for both British Summer Time (BST) and Greenwich Mean Time (GMT).
9. Support Center
In addition to the online help, you can access the MAXIMIZERCRM User’s Guide in .PDF format (to read online using Adobe Acrobat Reader). The User’s Guide contains similar information to the online help in a printable format (not that we encourage you to print it).
Similar to the online help, you can search the guide, and access hyperlinks from the table of contents, index, and cross-references to other places in the guide.
Tip: Why not save the guide to your local computer to access at any time, offline.
Further information
For more tips on how to configure your preferences in MAXIMIZERCRM and how to set the system up so that you can become even more effective and efficient, get in touch with us:
Tel: +44 (0)1992 661244
Email: enquiries@avrion.co.uk
Web form here
Subscribe to our YouTube channel


